Simple, vegetarian recipes found for and cooked at our Co-op.
Thursday, July 1, 2010
Sunday, June 27, 2010
Saturday, June 26, 2010
Falafel Failure
My posts usually have a "look at me! I'm an awesome cook" theme. And okay, some of the time I am a pretty good cook. But not always. I attempted to make Falafel on Thursday. And I failed. Big time.
They Looked So Promising....
Too bad they turned into this.
Eventually, I figured it out.
I even made like 6 falafels!
Things got off to a pretty bad start: I burnt some of the chickpeas and had to discard about a 1/3 of them. The first batch of falafel literally desinigrated as soon as it hit the hot oil. After wasting several falafels, I decided to lower the heat and add more flour (as a binding agent). Sadly, that didn't seem to work either. The falafel cooked but turned to mush as soon as I attempted to take it out of the oil. So I gave up on making vegan falafel and did the only think I thought might fix the mess. I added egg. Dunt Dunt Duhhh. The falafel stayed together much better after I doused them in egg yolk. I ended up with 5-6 sad looking falafels which were either terribly undercooked or burnt to a crisp.
This is the recipe I used. Don't even think about it.
Falafel
You Won't Need:- 9 oz. cooked chickpeas
- 1 clove garlic
- Salt, to taste
- 1/2 tsp. lemon juice
- 1 tsp. vegetable oil
- 1 tsp. flour
- Vegetable oil for deep-frying
- Combine all the ingredients, except the oil for deep-frying, and blend in a food processor.
- Taste and adjust the seasonings.
- Make balls (about the size of a lime) out of this mixture.
- Heat the oil for deep-frying and deep-fry 4 to 5 balls at a time.
Makes 4 servings
Monday, June 21, 2010
Friday, June 18, 2010
Wednesday, June 16, 2010
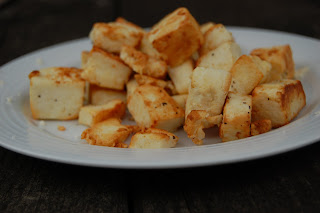
Chickpea Snacks
I wanted something nice and simple for this week's guff food. For those of you who don't live in a co-op, guff stands for General Unspecified Free Food. Each House buys communal ingredients from a organic farmer; everyone in the house is allowed to cook with them. In the summer we don't eat every meal together like in the school year. Instead, the house selects a "guff cook" who makes one food item per week for the House. The cook receives one work hour per week, so the recipes have to be pretty simple and easily multipliable. As the guff cook, I've made soup several times over the past couple of weeks and tonight had to be something different. So.... dunt dunt duhhh.
Chickpea Snacks!
You'll know when they're done because they'll have turned a nice brown-orange colour and gotten all crunchy.
You'll Need
- 2 cups of dry chickpeas
- Some H2O
- Salt
- Garlic Salt
- Cayenne Pepper
- Canola Oil
You Should:
- Soak the dried chickpeas overnight in water
- Dry them (duh)
- Coat them in oil and spice them to your liking
- Bake them at 450 degrees for 30 minutes until they're roasted
makes four servings
Pretty easy, eh?
Tuesday, June 15, 2010
Sunday, June 13, 2010
Japanese Night: Miso Soup and Maki Garden Rolls
For one of our Five Dollar Dinners, we made Miso Soup and Maki Rolls. Although there aren't any pictures of the miso soup (because soup is ugly) I took a few of our attempts to make sushi. It is ridiculously hard to make sushi. I was really terrible at it but Sunshine figured it out and made us a couple of sushi logs.
Miso Soup
You'll Need:
- 4 cups water
- 1/3 cup miso
- 3 chopped green onions
- 1 tbsp shredded nori seaweed
- 1/2 block firm tofu, cut into 1 inch cubes
- dash soy sauce
- 1/2 tsp sesame oil
Preparation:
- Bring water to a slow simmer and add seaweed. Allow to simmer at least 5-6 minutes.
- Whisk the miso in a cup of water before adding it to the soup. This is essential because miso is glunky and hard to mix in. Add a little bit of the miso water to the soup while whisking. Don't forget or you're soup will be gross.
- Reduce heat to very low and add the rest of the ingredients.
- Simmer the soup until the green onions are cooked but make sure you don't boil it. Miso shouldn't be boiled because it loses its flavour.
A couple of things to remember:
- Seaweed Preparation: The longer you simmer the seaweed, the less of a salty fishy flavor it will have. But be careful, if you simmer it too long it'll become bland.
- Miso comes in little jars and can be found in the international aisle of Meijer. There are several different types of miso with varying flavours. The two most common are
- Shiromiso (white miso) which is lighter
- Akamiso (red miso) which is stronger
Maki Rolls
You’ll need:
Sushi Rice
- 1 1/2 cups short-grain sushi white rice
- 1 Tbs. booze. (see note)
- 2 1/2 Tbs. rice vinegar
- 1 1/2 tsp. sugar
- 3/4 tsp. coarse salt
- 2/3 cup vegetable broth
- 3 Tbs. soy sauce
- 1 Tbs. mirin
- 12 green beans, trimmed
- 1 small carrot, cut into matchsticks
- 10 shiitake mushroom caps
- 3 sheets nori seaweed
- 3 tsp. toasted sesame seeds
- 1 cup sprouts
You Should:
To make Sushi Rice:
- Rinse rice under cold water.
- Bring rice, 1 2/3 cups water, and booze to a boil in saucepan. Reduce heat to low, cover, and simmer 10 minutes. Let rest 10 minutes off heat.
- Whisk together vinegar, sugar, and salt in bowl.
- Transfer rice to large bowl, and drizzle half of vinegar mixture over rice, while cutting through it with wooden spoon. Continue adding until all vinegar is absorbed. Cover with damp cloth, and cool.
To make Filling:
- Bring broth, soy sauce, and mirin to a boil in skillet. Add green beans and carrot, cover, and simmer 6 minutes.
- Transfer to plate with slotted spoon.
- Add mushrooms to remaining liquid, and bring to a simmer. Cover, and simmer 4 minutes, turning once.
- Cool and cut the vegetables into thin strips.
To Roll:
- Place 1 nori sheet shiny-side down on sushi mat.
- Spread one-third Sushi Rice over nori, leaving 1-inch border at top edge.
- Sprinkle with 1 tsp. sesame seeds.
- Arrange green beans, carrot, mushrooms, and sprouts in order below center line of rice.
- Dampen top edge of nori with water; roll up from bottom.
- Seal with top edge with water so it sticks
- And repeat.
- Each sushi log should be cut into 8 sushi slices
Some things to remember:
- You can use any type of wine or booze you want but traditionally it's made with sake which is rice wine. We just used some red wine that was lying around.
- Mirin is really sugary sake so if you can't find any just 1 tbs booze and 1 tsp sugar for every 1 tbs mirin you need. We couldn't find any in Meijer but the organic co-op store had some (surprisingly)
Thursday, June 10, 2010
Mostaccioli Pomodoro Style
Mostaccioli Pomodoro Style
16oz Mostaccioli pasta
1/4 cup extra virgin olive oil
2-1/2 cups diced tomatoes
1/2 cup fresh chopped basil (or 1/2 tsp dried basil)
2 tsp minced garlic (or 1/2 tsp garlic powder)
1 cup chicken broth
salt and pepper, to taste
1/2 cup grated Parmesan cheese
Cook Mostaccioli in 4 qts. boiling water for 10-12 mins.
Cook Mostaccioli in 4 qts. boiling water for 10-12 mins.
Drain, cover, and set aside pasta
Heat olive oil in large skillet
Add tomatoes, basil, garlic, and chicken broth; simmer for 2 mins
Toss hot pasta with sauce; mix well
Sprinkle with Parmesan cheese and salt and pepper to taste
Tuesday, June 8, 2010
Monday, May 31, 2010
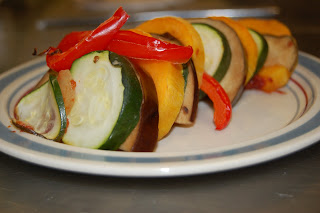
Ratatouille
I got sick of the cafeteria's sad attempts to make ratatouille and decided that I had to make it for myself. I had to wait several months until moving into the co-op before getting a chance but lets just say, last night's dinner was fabulous.
Ratatouille isn't as hard as it looks; the main thing you have to remember is to slice everything evenly or it won't cook well. And here is a perfect opportunity to use the en Papillote method I blogged about a couple of weeks ago.
nice and yummy, right out of the oven.
Ratatouille
You'll Need:
- 1 Squash
- 1 Zucchini
- 1 can of Tomato puree
- 1 Eggplant
- 2 cloves of garlic
- 1 Red Pepper
- 1/2 medium white onion
You should:
- Slice the squash, zucchini, and eggplant into thin slices. I sliced mine by hand but if you have a mandolin you should use one. If you don't know what a mandolin is, then don't worry about it.
- Chop the onion and dice the garlic
- Remember that the smaller you dice the garlic, the more intense the flavour.
- Coat the bottom of the pan with the tomato sauce, garlic and onion
- Arrange the rest of the vegetables in a 9x12 pan over the sauce mixture
- Cover the pan with a sheet of aluminum foil
- Bake for 45 minutes at 375 degrees
When its done, arrange it nicely on the plate
Friday, May 28, 2010
Tomato Soup
So tonight was another guff cooking adventure. I decided to make tomato soup using a recipe I found on the Food Network as my template. It actually came out really well and I'm pretty happy with it. I just hope everyone else likes it too.
soup is really hard to take pictures of...
Tomato Soup:
(Serves 24)
Ingredients
Ingredients
- 2 pound can chopped tomatoes
- 2 cups vegetable oil
- Salt and freshly ground black pepper
- 3 large carrots, diced
- 1 white onion, diced
- 4 cloves garlic, minced
- 3 bay leaves
- 2 tbs dry basil leaves
You'll need to:
- Preheat oven to 450 degrees F.
- Strain the chopped canned tomatoes, reserving the juices, and spread onto a baking sheet, season with salt and pepper, to taste, drizzle with 1/4 cup of the oil and roast until caramelized, about 15 minutes.
- Meanwhile, in a saucepan, heat remaining olive oil over low heat.
- Add the carrots, onion and garlic, cook until softened, about 10 minutes.
- Add the roasted chopped canned tomatoes, reserved tomato juices and bay leaves
- Simmer until vegetables are very tender, about 15 to 20 minutes.
- Stir in the basil
- Puree in a blender or food processor until as liquidey as your blender will blend it
- Add water until the soup reaches the consistency you want. I added 2 quarts water to 2 quarts tomato soup.
Wednesday, May 26, 2010
Martha Stewart Is My Home Girl:
For real. She is. I don't know why everyone hates on Martha all the time because she's awesome. My Martha Stewart Baking Handbook has got to be the greatest cookbook ever written and I love it dearly. Sadly, it is not really mine and belongs to the library. I'm going to be heartbroken when I have to return it next week. I've been baking a lot with the recipes from the book and here's one that I made last week:
the dough, it has risen!
nice buns, eh?
You'll need:
- 2/3 cup oats
- 1/4 cup flaxseed
- 1/2 cup boiling water
- 1 cup hot milk
- 1/4 ounce dry yeast
- 1/4 cup honey
- 2 large eggs lightly beaten
- 1 large egg yolk
- 1 pinch pepper
- 1 pinch salt
- 3 cups whole wheat flour
- 1 tbs coarse salt
You should:
- Put flaxseeds in a bowl and cover with boiling water. Set the bowl aside to cool entirely. The water should absorb within 5 minutes.
- In a bowl whisk together the milk, yeast and honey. Let it rest for 5 minutes until foamy.
- Add whole eggs, oats, flour, seed mixture, pepper, and salt. If you have an electric mixer, now would be a great time to use it. Sadly, I don't so I just mixed it with a large wooden spoon like in the olden days.
- Slowly add the whole wheat flour, 1/2 cup at a time until a soft dough forms. Be careful not to over-mix the dough because then it'll lose its elasticity and before gross and icky.
- Place the dough in a lightly oiled bowl and cover with a lid or plastic wrap. Put it in a warm place to rise. I usually put mine above the oven on a shelf because thats the warmest place in the kitchen. In the winter, by the heater is a good spot.
- Leave the dough until it doubles in bulk; it usually takes 1 1/2 to 2 hours for it to rise.
- Divide the dough into fist size balls and place them in 2 olive oiled cake pans. Cover the pans and let rise until the dough doubles again in bulk. This should take about 20-25 minutes.
- By the way- now is an excellent time to preheat the oven to 375 degrees
- Meanwhile, in a small bowl whisk together the egg yolk and 1 tbs water
- When the dough is done rising, brush the rolls with the egg wash, sprinkle with seeds and salt.
- Bake the rolls until they are dark brown in colour, about 20 minutes.
- Let the rolls cool for 15 minutes without removing them from the pans before unmolding and serving.
Tuesday, May 25, 2010
Crepes
In preparation for Saturday night's dinner party, we all attempted to make crepes. The theme for Saturday is "Cooking Around the World: France" and we're going to have ratatouille and crepes.
The crepes actually came out pretty well, the first one was a little thick and burnt but we soon caught the hang of it. We made our test-run crepes plain and didn't put any toppings on them. But afterall, it was just a test run.
Did I mention that Sarah was back from Germany?
I love cast-iron pans
Okay, so it got a little burnt...
Ten Wonderful Crepes
You'll need:
You'll need:
- 2 1/2 cups flour, sifted
- 5 eggs
- 1 1/4 cups milk
- 1 1/4 cups water
- 1/2 tsp salt
- 1/4 cup butter and some to coat the skillet
Directions:
1. In a large mixing bowl, whisk together the flour and the eggs. Gradually add in the milk and water, stirring to combine. Add the salt and butter; beat until smooth.
2. Heat a lightly oiled griddle or frying pan over medium high heat. Pour or scoop the batter onto the griddle, using approximately 1/4 cup for each crepe. Tilt the pan with a circular motion so that the batter coats the surface evenly.
- Cook the crepe for about 2 minutes, until the bottom is light brown. Loosen with a spatula, turn and cook the other side. Serve hot.
Friday, April 30, 2010
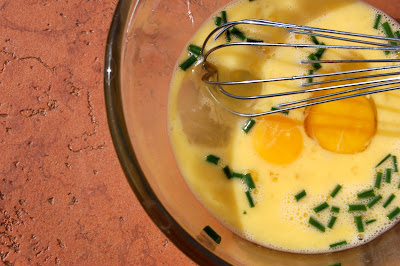
Chive Omelettes
After a long exhausting two weeks of exams, I'm finally home in my own kitchen again. This morning I woke up with the excitement of knowing that for once, I could choose what to eat for breakfast and not be limited by a dorm cafeteria's offerings.
For awhile I thought about just eating cereal and calling it good, but that's kinda lame. Instead, I decided to take a peek outside and see what my little sister's garden had to offer. Sadly, since Michigan has a late spring, chives are the only plant actually alive. So here it is:
What your finished product should look like.
And yes, I took these pictures.
Fresh chives = love
whisking eggs makes me happy
A Single Chive Omelette
You'll need:
- 4 eggs
- 2 tsps water
- 1 tablespoon butter (to coat the skillet)
- 1/2 tsp fresh cut chives, chopped
- salt to taste
- Pick, wash and chop your chives into little teeny tiny pieces
- Whisk the eggs and water, but lightly, you just want to whisk them just enough to blend the eggs and yolks not to beat the crap out of them
- Add your chives to the eggs, of course.
- Melt the butter in your skillet. Be careful, you want the butter to melt but not to brown.
- Add the blended mixture to the skillet and turn the heat up (way, way up) to as hot as your stove will go
- You'll need to shake the skillet a little bit to make sure the egg mixture is evenly spread, it can't hurt to add in some hip action here, cooking should be fun.
- There are several ways to fold an omelette; if you like your way, feel free to do that. I won't judge you. I like to make my omelettes a la Julia Child. Swirl the omelette around a little bit (for about 20 seconds) then start jerking it towards you so it folds over. Once its looks all omelettey and cooked to your liking, take if off the heat and you're all done.
- Since this is easier to understand when you see it, I've uploaded an episode of Julia Child's cooking show at the end of this post. Just skip to 5:10 if you want to see her do this part.
Some things to remember:
- Make sure you're using the right type of pan. Although they sell really swanky omelette pans, you don't really need one of those. Just get a skillet thats about 2 inches tall and a good size for a one person omelette.
- If your omelette is too runny, just heat it up in the microwave for 20-30 seconds to dry it out.
If you want some inspiration, watch my home-girl, Julia Child
Subscribe to:
Posts (Atom)


